This pattern is for a mobile containing a DNA helix along with the 4 bases that make up DNA. It also contains the pattern to make Uracil (a base-like molecule found in RNA).
DNA carries the genetic information that codes for all of the proteins that make up your body and allow it to function. The DNA model in the centre is approximately to scale, with a scale factor of 3x10^7. I've also included a lot of information on the science behind DNA intermixed with the pattern if you're interested.
Difficulty:
Easy - medium
You will need:
- A 2mm crochet hook
- Dk yarn in purple, yellow, turquoise, dark pink, light pink, black, dark blue, and a scrap of white (although you're free to choose whatever colours do want for the base pairs)
- An embroidery hoop
- Craft wire
- Black yarn or crochet cotton for the embroidery, I used black #10 crochet cotton (you could use embroidery thread, but you would need to use a full strand so it would work out pretty expensive)
- Toy stuffing
- A darning needle
- A pair of scissors
Note:
- 'sc12' means 'sc in each of the next 12sts'
- 'fasten off neatly' refers to a special way of fastening off which is neater and makes it easier to see where you should be crocheting on the next round (also known as invisible fastening off). This involves pulling up your yarn through your stitch, threading the yarn underneath the second stitch from where you pulled your yarn up, then threading your yarn back through the top of this stitch and down through the back of the work. There is a very helpful site that explains it clearly found here. This is optional,but I find it makes the overall finish nicer.
So what is DNA?
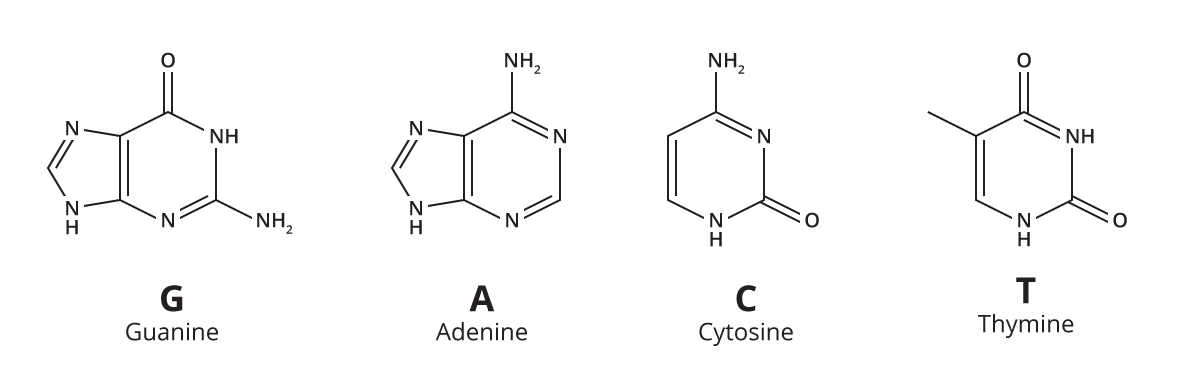
DNA consists of 3 types of molecules: phosphate groups, a sugar called deoxyribose, and organic bases, which are what codes for all the proteins (see protein patterns) that make you up. These organic bases come in 4 different types, known as Cytosine, Adenine, Guanine, and Thymine, often referred to simply as C, A, G, and T respectively.
These pair up within the structure of the DNA, with cytosine bonding with guanine, and adenine bonding with thymine. This is what ensures that DNA replication occurs correctly; if there is a C base on one DNA strand (see DNA helix pattern for more info on the structure of DNA), then there must be a G base on the other strand.
Part 1: The DNA bases
For Guanine:
Make all sections using turquoise yarn
For the smaller section (make 2):
Make a magic loop with 5sc
Round 1: make 2sc in each st (10sc)
Round 2: (sc, make 2sc in the next st) 5 times (15sc)
Round 3: (sc2, make 2sc in the next st) 5 times (20sc)
Round 4: (sc3, make 2sc in the next st) 5 times (25sc)
Round 5: sc5, ch6, sc in the 2nd chain st from hook, sc in the next 4 chain sts, then sc in the same st as the one you crocheted in before you made the ch6, (sc4, make 2sc in the next st) 4 times
Round 6: sc4, sc2tog between the next st and the back loop of the next chain st, sc in the back loop of the next 3 chain sts, make 2sc in the back of the last chain st. Make 2sc in the next st, sc3, sc2tog, (sc5, make 2sc in the next st) 4 times
Round 7: sc4, sc2tog, sc3, make 2sc in the next st, slip5, sc2tog, sc5, make 2sc in the next st (sc6, make 2sc in the next st) twice, sc7
Fasten off neatly
For the front:
Make a magic loop with 6sc
Round 1: make 2sc in each st (12sc)
Round 2: (sc in the first st, make 2sc in the next st) 6 times to end (18sc)
Round 3: (sc in the first 2 sts, make 2sc in the next st) 6 times to end. ch1, turn (24sc)
Round 4: (sc in the first 3 sts, make 2sc in the next st) 6 times to end (30sc)
Round 5: sc4, make 2sc in the next st, (sc5, ch6, sc in the 2nd chain st from hook, sc in the next 4 chain sts, then sc in the same st as the one you crocheted in before you made the ch6) twice, sc5, ch11, sc in the 2nd loop from hook, sc in the next 4 chain sts, ch6, sc in the 2nd loop from hook, sc in the next 4 chain sts, sc in the next 5 chain sts of the ch11 section, then sc in the same st as the one you crocheted in before you made the ch11, (sc4, make 2sc in the next st) twice
Round 6: sc5, make 2sc in the next st, (sc4, sc2tog between the next st and the back loop of the next chain st, sc in the back loop of the next 3 chain sts, make 2sc in the back of the last chain st. Make 2sc in the next st, sc3, sc2tog) twice, sc4, sc2tog between the next st and the back of the next chain st, sc in the back loop of the next 3 chain sts, sc2tog between the back loop of the next 2 chain sts, sc in the back loop of the next 3 chain sts. Make 2sc in the back of the last chain st, then make 2sc in the next st. Sc in the next 3 sts, sc2tog between the next st and the back of the next chain st, sc in the back loop of the next 3 chain sts, make 2sc in the back loop of the last chain st. Make 2sc in the next st, sc3, sc2tog, sc3, sc2tog, (sc5, make sc in the next st) twice
Round 7: sc6, make 2sc in the next st, sc4, sc2tog, sc3, make 2sc in the next st, slip5, sc2tog, sc3, sc2tog, sc3, make 2sc in the next st, slip5, sc2tog, sc3, sc2tog, sc2, sc2tog, sc3, make 2sc in the next st, slip6, sc4, make 2sc in the next st, slip9, sc2tog, sc5, make 2sc in the next st, sc6, make 2sc in the next st
Fasten off neatly
For the back:
Make a magic loop with 6sc
Round 1: make 2sc in each st (12sc)
Round 2: (sc in the first st, make 2sc in the next st) 6 times to end (18sc)
Round 3: (sc in the first 2 sts, make 2sc in the next st) 6 times to end. ch1, turn (24sc)
Round 4: (sc in the first 3 sts, make 2sc in the next st) 6 times to end (30sc)
Round 5: sc5, ch11, sc in the 2nd loop from hook, sc in the next 4 chain sts, ch6, sc in the 2nd loop from hook, sc in the next 4 chain sts, sc in the next 5 chain sts of the ch11 section, (sc5, ch6, sc in the 2nd chain st from hook, sc in the next 4 chain sts, then sc in the same st as the one you crocheted in before you made the ch6) twice
Round 6: (sc4, make 2sc in the next st) 3 times, sc4, sc2tog between the next st and the back of the next chain st, sc in the back loop of the next 3 chain sts, sc2tog between the back loop of the next 2 chain sts, sc in the back loop of the next 3 chain sts. Make 2sc in the back of the last chain st, then make 2sc in the next st. Sc in the next 3 sts, sc2tog between the next st and the back of the next chain st, sc in the back loop of the next 3 chain sts, make 2sc in the back loop of the last chain st. Make 2sc in the next st, sc3, sc2tog, sc3, sc2tog, (sc4, sc2tog between the next st and the back loop of the next chain st, sc in the back loop of the next 3 chain sts, make 2sc in the back of the last chain st. Make 2sc in the next st, sc3, sc2tog) twice, (sc5, make 2sc in the next st) 3 times
Round 7: sc4, sc2tog, sc2, sc2tog, sc3, make 2sc in the next st, slip6, sc4, make 2sc in the next st, slip9, sc2tog, (sc3, sc2tog, sc3, make 2sc in the next st, slip5, sc2tog) twice, (sc5, make 2sc in the next st), sc6
Fasten off neatly
Place the front section next to one of the smaller sections, as shown in the first photo, and sew them together. Do the same for the back section, but make sure that the sections are lines up as shown in the third photo before you sew them together (so that they are the mirror image of the front).


After this you will need to embroider the chemical symbols onto each of the sections of crochet, as shown below (this shows the front section, you should embroider the reverse symbols onto the back section). The structure of each of the bases is also given at the start of this pattern as an extra reference point. Note that for bases G and A this structure shows the BACK of the the bases (this is important to allow them to pair up correctly)
I made each of the long straight sections representing the bonds by making a long strand from the start of the bond to the end, then making a few very small stitches along its length to secure it in place. This is demonstrated in the photos below.
You should also embroider the letter 'G' onto the back section.
For the eyes (make 2):
With black ch3
Round 1: make 2sc in the 2nd loop from hook, then make 3sc in the first chain st you made. Make 2sc into the back loop of the first chain st you crocheted into. (8sc)
Fasten off
Use white embroidery thread to embroider highlights onto the eyes, then sew them to the head. I found that the effect was better if you used the 'wrong side' of the crochet to face outwards. After you've done this embroider a mouth onto your base.
Sew the front and back sections of the head together , stuffing as you do so. Sew them together using a close backstitch (or running stitch if you prefer) so that you keep the ridge on the outside of the crochet.
Fun fact 1:
Typing at 60 words per minute for 8 hours a day it would take 50 years to type the entire human genome.
For Adenine:
Use yellow yarn throughout
For the small section (make 2):
Make a magic loop with 5sc
Round 1: make 2sc in each st (10sc)
Round 2: (sc, make 2sc in the next st) 5 times (15sc)
Round 3: (sc2, make 2sc in the next st) 5 times (20sc)
Round 4: (sc3, make 2sc in the next st) 5 times (25sc)
Round 5: sc5, ch6, sc in the 2nd chain st from hook, sc in the next 4 chain sts, then sc in the same st as the one you crocheted in before you made the ch6, (sc4, make 2sc in the next st) 4 times
Round 6: sc4, sc2tog between the next st and the back loop of the next chain st, sc in the back loop of the next 3 chain sts, make 2sc in the back of the last chain st. Make 2sc in the next st, sc3, sc2tog, (sc5, make 2sc in the next st) 4 times
Round 7: sc4, sc2tog, sc3, make 2sc in the next st, slip5, sc2tog, sc5, make 2sc in the next st (sc6, make 2sc in the next st) 3 times, sc7
Fasten off neatly
For the larger section (make 2):
Make a magic loop with 6sc
Round 1: make 2sc in each st (12sc)
Round 2: (sc in the first st, make 2sc in the next st) 6 times to end (18sc)
Round 3: (sc in the first 2 sts, make 2sc in the next st) 6 times to end. ch1, turn (24sc)
Round 4: (sc in the first 3 sts, make 2sc in the next st) 6 times to end (30sc)
Round 5: sc5, ch11, sc in the 2nd loop from hook, sc in the next 4 chain sts, ch6, sc in the 2nd loop from hook, sc in the next 4 chain sts, sc in the next 5 chain sts of the ch11 section, then sc in the same st as the one you crocheted in before you made the ch11, (sc4, make 2sc in the next st) 5 times
Round 6: sc4, sc2tog between the next st and the back of the next chain st, sc in the back loop of the next 3 chain sts, sc2tog between the back loop of the next 2 chain sts, sc in the back loop of the next 3 chain sts. Make 2sc in the back of the last chain st, then make 2sc in the next st. Sc in the next 3 sts, sc2tog between the next st and the back of the next chain st, sc in the back loop of the next 3 chain sts, make 2sc in the back loop of the last chain st. Make 2sc in the next st, sc3, sc2tog, sc3, sc2tog, (sc5, make 2sc in the next st) 5 times
Round 7: sc4, sc2tog, sc2, sc2tog, sc3, make 2sc in the next st, slip6, sc4, make 2sc in the next st, slip9, sc2tog, (sc6, make 2sc in the next st) 3 times, sc7
Fasten off neatly
Once again you will need to sew each of the small sections to the larger sections, as shown below (this shows the front section: the back will be essentially the same but with the smaller section on the left and the larger section on the right)

You now need to embroider the chemical symbols in place. (It may be easier to use the image at the top of this pattern for the reference, since the photo below isn't ideal for showing whats going on.)
You should sew a letter 'A' onto the back section, similarly to how you did for guanine.
For the eyes (make 2):
With black ch3
Round 1: make 2sc in the 2nd loop from hook, then make 3sc in the first chain st you made. Make 2sc into the back loop of the first chain st you crocheted into.
Fasten off
Use white embroidery thread to embroider highlights onto the eyes, then sew them to the head, as you have did for guanine. Sew a smile onto the face.

You will then need to sew the front and back sections together, stuffing firmly.
Fun fact 2:
Every human shares 99.9% of their DNA with every other human
How do the bases know who they should pair up with?
The pairing of the bases occurs due to attractions called hydrogen bonds that occur between the bases. Essentially the hydrogen atoms on the outside of one base are attracted to the oxygen/ nitrogen atoms on the outside of the base its paired with. Cytosine and Guanine can form 3 of these bonds between each other, whilst Adenine and Thymine can only form two. This is one factor that ensures they bond correctly.
Another factor is the shape the bases form when bonded together. As you may have noticed, the bases come in 2 different sizes. The smaller ones, Cytosine and Thymine, are known as pyrimidines, whereas Guanine and Adenine are classes as purines. The bonding of one pyrimidine with one purine endures that the overall structure formed has a very similar shape (as you should be able to see in the image below). This allows them to fit tightly together within the DNA strand. Any other bonding would not fit nicely within the DNA helix, meaning that it would be unstable, and would inevitably be ripped apart.
Additionally, this shape is able to fit neatly into the active site of the enzyme that creates DNA, known as DNA polymerase. (see enzyme pattern and possibly a pattern on DNA structure)

For Cytosine:
Use purple yarn throughout
For the front:
Make a magic loop with 6sc
Round 1: make 2sc in each st (12sc)
Round 2: (sc in the first st, make 2sc in the next st) 6 times to end (18sc)
Round 3: (sc in the first 2 sts, make 2sc in the next st) 6 times to end. ch1, turn (24sc)
Round 4: (sc in the first 3 sts, make 2sc in the next st) 6 times to end (30sc)
Round 5: sc5, ch11, sc in the 2nd loop from hook, sc in the next 4 chain sts, ch6, sc in the 2nd loop from hook, sc in the next 4 chain sts, sc in the next 5 chain sts of the ch11 section, then sc in the same st as the one you crocheted in before you made the ch11.(Sc4, make 2sc in the next st) twice, (sc5, ch6, sc in the 2nd chain st from hook, sc in the next 4 chain sts, then sc in the same st as the one you crocheted in before you made the ch6) twice, sc4, make 2sc in the next st
Round 6: sc4, sc2tog between the next st and the back of the next chain st, sc in the back loop of the next 3 chain sts, sc2tog between the back loop of the next 2 chain sts, sc in the back loop of the next 3 chain sts. Make 2sc in the back of the last chain st, then make 2sc in the next st (the first one you made when crocheting into the chain sts of the previous round). Sc in the next 3 sts, sc2tog between the next st and the back of the next chain st, sc in the back loop of the next 3 chain sts, make 2sc in the back loop of the last chain st. Make 2sc in the next st, sc3, sc2tog, sc3, sc2tog, sc5, make 2sc in the next st, sc5, make 2sc in the next st, (sc4, sc2tog between the next st and the back loop of the next chain st, sc in the back loop of the next 3 chain sts, make 2sc in the back of the last chain st. Make 2sc in the next st, sc3, sc2tog) twice, sc5, make 2sc in the next st
Round 7: sc4, sc2tog, sc2, sc2tog, sc3, make 2sc in the next st, slip6, sc4, make 2sc in the next st, slip9, sc2tog, sc5, make 2sc in the next st, sc6, make 2sc in the next st, sc4, sc2tog, sc3, make 2sc in the next st, slip5, sc2tog, sc3,sc2tog, sc3, make 2sc in the next st, slip5, sc2tog, sc5, make 2sc in the following st, slip1
Fasten off neatly
For the back:
Make a magic loop with 6sc
Round 1: make 2sc in each st (12sc)
Round 2: (sc in the first st, make 2sc in the next st) 6 times to end (18sc)
Round 3: (sc in the first 2 sts, make 2sc in the next st) 6 times to end. ch1, turn (24sc)
Round 4: (sc in the first 3 sts, make 2sc in the next st) 6 times to end (30sc)
Round 5: sc5, ch11, sc in the 2nd loop from hook, sc in the next 4 chain sts, ch6, sc in the 2nd loop from hook, sc in the next 4 chain sts, sc in the next 5 chain sts of the ch11 section, then sc in the same st as the one you crocheted in before you made the ch11. sc4, make 2sc in the next st, (sc5, ch6, sc in the 2nd chain st from hook, sc in the next 4 chain sts, then sc in the same st as the one you crocheted in before you made the ch6) twice, (sc4, make 2sc in the next st) twice
Round 6: sc4, sc2tog between the next st and the back of the next chain st, sc in the back loop of the next 3 chain sts, sc2tog between the back loop of the next 2 chain sts, sc in the back loop of the next 3 chain sts. Make 2sc in the back of the last chain st, then make 2sc in the next st. Sc in the next 3 sts, sc2tog between the next st and the back of the next chain st, sc in the back loop of the next 3 chain sts, make 2sc in the back loop of the last chain st. Make 2sc in the next st, sc3, sc2tog, sc3, sc2tog, sc5, make 2sc in the next st, (sc4, sc2tog between the next st and the back loop of the next chain st, sc in the back loop of the next 3 chain sts, make 2sc in the back of the last chain st. Make 2sc in the next st, sc3, sc2tog) twice, (sc5, make 2sc in the next st) twice
Round 7: sc4, sc2tog, sc2, sc2tog, sc3, make 2sc in the next st, slip6, sc4, make 2sc in the next st, slip9, sc2tog sc5, make 2sc in the next st, sc4, sc2tog, sc3, make 2sc in the next st, slip5, sc2tog, sc3, sc2tog, sc3, make 2sc in the next st, slip5, sc2tog, (sc5, make 2sc in the next st) twice
Fasten off neatly
Embroider the chemical symbols onto each of the sections of crochet, as you have done for the previous bases, following the embroidery on the crochet below (which, once again, shows the front section of the crochet). You should also embroider the letter 'C' onto the back section, as shown below in the 2nd photo.
For the eyes (Make 2):
With black ch3
Round 1: make 2sc in the 2nd loop from hook, then make 3sc in the first chain st you made. Make 2sc into the back loop of the first chain st you crocheted into.
Fasten off
Use white embroidery thread to embroider highlights onto the eyes, then sew them to the head, as you have done for the previous bases

Sew the front and back sections of the bases together.


Fun fact 3:
Despite being much simpler organisms than humans, the gene of the aomeba is 200 times greater!
For Thymine:
Use dark pink yarn throughout
For the front and back (make 2):
Make a magic loop with 6sc
Round 1: make 2sc in each st (12sc)
Round 2: (sc in the first st, make 2sc in the next st) 6 times to end (18sc)
Round 3: (sc in the first 2 sts, make 2sc in the next st) 6 times to end. ch1, turn (24sc)
Round 4: (sc in the first 3 sts, make 2sc in the next st) 6 times to end (30sc)
Round 5: (sc5, ch6, sc in the 2nd chain st from hook, sc in the next 4 chain sts, then sc in the same st as the one you crocheted in before you made the ch6) 5 times, sc4, make 2sc in the last st
Round 6: (sc4, sc2tog between the next st and the back loop of the next chain st, sc in the back loop of the next 3 chain sts, make 2sc in the back of the last chain st. Make 2sc in the next st, sc3, sc2tog) 5 times, sc5, make 2sc in the last st
Round 7: sc4, sc2tog, sc3, make 2sc in the next st, slip5, sc2tog, (sc3, sc2tog, sc3, make 2sc in the next st, slip5, sc2tog) 4 times, sc5, make 2sc in the last st
Fasten off neatly
You now need to sew the chemical symbols onto the bases, as you did for the previous bases. The structure of thymine is shown below, (and can once again be found at the start of this pattern if you are struggling to see it properly). Once again you should sew the reverse of this structure onto the back of the base, and sew a 'T' into the centre, as shown below.


For the eyes (Make 2):
With black ch3
Round 1: make 2sc in the 2nd loop from hook, then make 3sc in the first chain st you made. Make 2sc into the back loop of the first chain st you crocheted into.
Fasten off
Embroider highlights onto these and sew them onto the face, as you did for cytosine. Embroider the mouth in place underneath, then sew the front and back sections together, stuffing firmly as you do so.
But wait - that's not all the possible bases
A similar molecule to our DNA is RNA. This is a single-stranded molecule whose strands differ in two ways to those of DNA: firstly the sugar in the structure is ribose, not deoxyribose, but also because the base Thymine is replaced with a slightly different base known as Uracil, the pattern for which is given below.

For Uracil:
Use light pink yarn throughout
For the front and back (make 2):
Make a magic loop with 6sc
Round 1: make 2sc in each st (12sc)
Round 2: (sc in the first st, make 2sc in the next st) 6 times to end (18sc)
Round 3: (sc in the first 2 sts, make 2sc in the next st) 6 times to end. ch1, turn (24sc)
Round 4: (sc in the first 3 sts, make 2sc in the next st) 6 times to end (30sc)
Round 5: (sc5, ch6, sc in the 2nd chain st from hook, sc in the next 4 chain sts, then sc in the same st as the one you crocheted in before you made the ch6) 4 times, (sc4, make 2sc in the last st) twice
Round 6: (sc4, sc2tog between the next st and the back loop of the next chain st, sc in the back loop of the next 3 chain sts, make 2sc in the back of the last chain st. Make 2sc in the next st, sc3, sc2tog) 4 times, (sc5, make 2sc in the last st) twice
Round 7: sc4, sc2tog, sc3, make 2sc in the next st, slip5, sc2tog, (sc3, sc2tog, sc3, make 2sc in the next st, slip5, sc2tog) 3 times, (sc5, make 2sc in the last st) twice
Fasten off neatly
You now need to sew the chemical symbols onto the bases. These are exactly the same as for Thymine, but without the single protruding line that symbolises a CH3 group (as you can see below)

For the eyes (Make 2):
With black ch3
Round 1: make 2sc in the 2nd loop from hook, then make 3sc in the first chain st you made. Make 2sc into the back loop of the first chain st you crocheted into.
Fasten off

Embroider highlights onto these and sew them onto the face, as you did for the previous bases. Embroider the mouth in place underneath, then sew the front and back sections together, stuffing firmly as you do so.

But why is Uracil present in RNA instead of Thymine?
When life first started, the genetic code was stored in RNA instead of DNA. However, this was inherently unstable, because of the presence of the OH group of the 2' position on the ribose sugar (link to another pattern that explains this further). When organisms became more complex RNA was replaced with DNA, which consisted of deoxyribose, in which this OH group was missing. Another form of instability came from the fact that certain mutations in DNA can result in cytosine bases undergoing a chemical process that changed them into uracil bases. Luckily, our clever cells evolved a DNA repair enzyme called DNA glycosylase (see enzyme pattern for more information on enzymes) to pick up on this and convert these mutated bases back into cytosine. This is why it is necessary that uracil is replaced with thymine, which has a very similar structure (so is still able to bind to adenine), but is not exactly the same. If uracil were present the DNA repair enzymes would go around converting all the uracil bases it found into cytosine, regardless of whether or not this is what they should actually be.
Part 2: The DNA helix
For the sugar-phosphate backbone (make 2):
With dark blue dk yarn ch9
Round 1: sc in the first chain st you made, then sc in every following chain st to make a loop
Round 2: sc in each of these 9 sts
Repeat round 2 until the backbone measures around 28cm Fasten off
Information on the DNA backbone
This backbone of the DNA helix is made up of alternating molecules of phosphate and a sugar called deoxyribose. It is a strong structure that is not easily broken. The backbone strands have a polarity. This is different from the type of polarity you may have encountered in chemistry, but it gives us a way to specify the direction of the molecule. This polarity is determined by the direction of the deoxyribose molecules, and to see how this works we need to first examine the structure of these and how they fit together with the phosphate groups in the chain.
The deoxyribose sugar contains 5 carbon atoms, and they are numbered 1 - 5, with the first carbon atom being the one attached to the bases, and the 5th one being the side chain attached to the phosphate group. This means that the 3rd carbon atom will also be attached to a phosphate group. Therefore the DNA backbone is said to run from the 5' end (from the phosphate group attached to a carbon number 5) to the 3' end (i.e. the phosphate group attached to a carbon number 3). This gives the polarity of the strand. In DNA the two backbone strands run in opposite directions relative to each other, and this has important implications during processes such as DNA replication.
For the bases:
You need to make a total of 40 bases, and the number of G and C bases should be equal, as should the number of A and T bases.
With a 2mm hook make a magic loop with 5sc
Round 1 - 3: (3 rounds) sc in each st
Fasten of
To make up:
Sew the bases together in pairs (A with T, C with G)
Thread a length of wire through the backbone, and sew it to the edge so that it is held in place. This will keep the backbone rigid, so that the helix holds its shape better.
You will then need to sew the bases in place. Start by sewing one base pair to the bottom of the helix and another to the top, to ensure that the two backbone strands will match up.
After this you need to sew the remaining base pairs in between. Try to twist the helix as you sew them on, to ensure that it will keep its helix shape. You should try to get between 1.5 and 2 full turns into the length of the helix (technically it should be 2 turns but I found that this was very difficult to achieve).
The final stage is to assemble the mobile. Cut 3 lengths of white yarn approx. 25cm long and tie them at equal intervals to the edge of the embroidery hoop. Tie the other ends to each other in the centre of the loop. Secure the ends in place with a dab of PVA glue.


Next you need to sew another section of yarn to the centre of the hoop, to where you tied the three lengths of yarn together. Sew the other end of this to the helix, so that the centre of the nucleus hangs about 25cm below the embroidery hoop. You should then attach the cuddly bases around the outside so that they hang at varying lengths, as shown below.

That's all for this pattern! I hope you have found it interesting. As I said I plan to make a whole series of biochemistry-related patterns - please let me know if there's anything particular you'd like me to make. This applies especially to if there was anything mentioned in this post that you were unsure about or thought wasn't explained properly - I'm planning to do some patterns going into more detail about some of the topics mentioned.
Please let me know if you have any questions about this or any of my other patterns, either by leaving a comment below or via my Ravelry or Instagram pages.
You are very welcome to sell finished products but I do ask that you don't re-post this pattern or claim it as you're own. Thank you!